E-Mail
Features and Options
Checking Guest e-mail accounts
Configure VIP PowerNet 1.1 to gather mail from all of your VIP mail accounts whenever
you click 'Check Mail'.
Composing rich e-mail
VIP PowerNet 1.1 lets you compose rich HTML messages. You can send pictures, insert
colorful texts, change text fonts, and explore other options for expressing yourself.
Address book features
We've added Place In Tray
and Note buttons and new contact information options for all of the listings in
your address book.
New mail notification
VIP PowerNet 1.1 will notify you whenever someone sends you e-mail, while you
surf the net.
Checking
External Accounts
VIP
PowerNet will allow its users to access their e-mail from different places through
our VIP Guest feature and Configure Account option. When you use the VIP Guest
option it will download the copy of the mail from the server on to the computer
and after you sign off it will delete the mail from the computer. When you configure
the account it will download the mail from the server and leave it on to your
computer. Using
VIP Guest Click
on VIP Guest icon at the bottom left corner of the sign on screen. Enter in the
user name and password and click OK.
Note: If you get any connection
error, please modify the location or the modem settings according to your area
code rules. Configure
Account
To add and configure an external e-mail account:
1. Click on Configure Account icon in the sign on screen, and then enter in the
user name and password that you want to configure. If you are already connected
then click on My VIP Preferences icon at the top of the browser and select configure
account option from the drop down menu. Then enter in the user name and password
that you want to configure. Click on OK and it will pop up a message saying "Account
Configured Successfully". You can also click on CP (control panel) icon at the
bottom of the browser in the status bar and configure account from the control
panel.
Editing an external e-mail account
You can edit an external e-mail
account if you need to update your location settings.
To edit an external
e-mail account:
1. Select the account in the sign on screen and click on
Modify Location icon.
2. Follow all the steps and make the necessary changes
according to your settings.
3. Click Finish to close the dialog box.
Removing an external e-mail account
When
you no longer need an external e-mail account, you can delete it.
To
remove an external e-mail account: 1.
On the Sign-On screen, select the account you want to delete, and then click on
Delete User icon.
2. Click on Yes at the prompt.
Checking your
external e-mail account for mail
If you added and configured an external e-mail account, you can check your mail
on the same computer. To
check your external e-mail account for mail:
1. Sign on using the external
e-mail account.
2. Click on Mail Room icon and select the Mail Room option
from the drop down menu.
VIP PowerNet connects to download your mail.
Deleting messages from your external e-mail account When
you check your external e-mail account for mail with VIP PowerNet, any messages
you received at this account are downloaded to your computer. After these messages
are downloaded, you can delete these messages from your computer. This means that
the next time you use that account, the messages will no longer be there.
To delete messages from your external e-mail account after download:
1. Select the e-mail you want to delete and click on Delete icon or hit delete
key from the keyboard.
Composing Rich Mail
We've add the ability to create
rich e-mail compositions. To do so, click on the HTML tab in the Compose room
and notice the new tool bar activated, located between the Subject field and the
message text field. You can use this toolbar to create a variety of rich email
messages. 
o Changing
font style
o Changing text color
o Selecting a custom color
o Inserting
a bulleted list
o Changing text alignment
o Changing message format
o Inserting a text file
o Inserting a hyperlink
Changing
font style
You can change the font of the text in the HTML e-mail
messages you compose. You can select from the fonts that are installed on your
computer.
To change the font:
1. Click on the first drop down menu
2. Select a font from the Font list.
Changing text color
You can change the text color in HTML e-mail messages you compose. You can
select from 48 predefined colors, or create custom colors.
To change
the text color in the message you are composing:
1. Click on the color icon
 next to the bullet icon.
In the Color dialog box, click a colored square to select a new text
color. next to the bullet icon.
In the Color dialog box, click a colored square to select a new text
color.
2. Click OK.
Selecting a custom color
You can define a custom color for your
e-mail text:
To define a custom color:
1. In the Color dialog box,
click Define Custom Colors.
2. Click a color within the color chart displayed.
3. When you have selected a color you like, click Add to Custom Colors to
copy it to the custom colors.
4. Select a custom color from the ones you
have defined.
5. Click OK.
Inserting a bulleted list
You can insert a bulleted list into a message when you want to organize information
into a list.
To insert a bulleted list:
1. Click on the bullet
icon  next
to the color icon. next
to the color icon.
2. A bullet appears in the body of the message. Type the
first item of your list and press Enter.
3. Another bullet appears. Type
the second item of your list and press Enter.
4. Repeat step 2 until you
have finished typing your bulleted list.
5. When you are finished typing
your bulleted list, press Enter and click on the bullet icon once again. Changing
text alignment
You can change the alignment of the text in the HTML
e-mail messages you write.
To change alignment:
1. Select the text
or graphic you want align.
2. Click on either left align icon  to
left align the text, center icon to
left align the text, center icon  to
center the text or right align icon to
center the text or right align icon  to
right align the text. to
right align the text.
Changing the message format VIP
PowerNet 1.1 allows you to switch between HTML (rich text) and plain text message
formats.
To change the e-mail message format:
1. Click on the HTML icon on the right
side of the email toolbar  to
switch to the plain text. If it is displaying the Plain icon to
switch to the plain text. If it is displaying the Plain icon  then
click on it once to switch it to the HTML format. then
click on it once to switch it to the HTML format. Inserting
a text file into a message
When you insert a text file into your
e-mail message, the contents of the text file are placed in the body of the message.
To insert a text file into an e-mail message:
1. Click on the open
icon  next
to the left align icon. next
to the left align icon.
2. In the Insert Text File dialog box, click the
Look in arrow to select from the list the folder that contains the text file.
3. Select the file you want to insert and then click Open.
The contents
of the text file appear in the body of your message.
Inserting a
hyperlink into a message
Instead of sending someone a Web page,
you can insert a hyperlink into your e-mail message. When a person reads your
message, they can click the hyperlink that will then bring them to the Web page
you want them to see.
To insert a hyperlink into an e-mail message:
· Click on the address bar once and copy the URL you want to insert in the
e-mail message. Then go to the e-mail message and paste it into the text of the
e-mail.
Address Book Features
You can
use the VIP PowerNet Address Book to save the e-mail addresses for the people
you send e-mail to. With your Address Book you can easily keep all of your e-mail
addresses in one place. To
open your Address Book, click on Mail Room icon and select the Address Book option
from the drop-down menu.
o Address List
o Select Recipients Button
o Remove Button
o New Button
o Edit Button
o Delete Button
Address List
The address list displays all the entries you
created in your Address Book. To address a message, you can select entries from
the address list. The Name, E-mail, Nickname and Phone column headings display
the information you provided when creating each entry. You can sort your Address
Book entries by these columns to easily locate an entry. To sort a list according
to a column, simply click on the title of that column. Select
Recipients Button
To add an address to the send To box, select the
entry you want to add and then click the To button next to the Address list. To
add an address to the Cc box, select the entry you want to add and then click
the Cc button next to the Address list. To add an address to the Bcc box, select
the entry you want to add and then click the Bcc button next to the Address list.
Remove Button To
remove an address from the send To, Cc, or Bcc box of the Address Book, select
the entry from any of the boxes and then click on Remove. New
Button VIP
PowerNet 1.1 allows you to save a person's contact information along with their
email address. To create an Address Book entry, click New in your Address Book,
and then type the following information in the New dialog box:
| First
Name | Type
the first name for this entry. | | Middle
Name | Type
the middle name for this entry. | | Last
Name | Type
the last name for this entry. | | Display
| Displays
the full name or the nickname for the entry. This name will appear in the Address
Book screen. | | Nickname | Type
a keyword that will help you to remember this person. | | E-mail
address | Type
the full e-mail address for this entry | | Notes | You
can write any extra notes regarding the contact. For example, person's birth date,
phone number, contact information, etc
| | Home | In
this tab, you can enter in the personal information regarding the contact. For
example, Address, Cellular number, Fax number, Web address and Phone number. |
| Business | In
this tab, you can enter in the business information regarding the contact. For
example, company name, address, job title, department, office, phone, fax, pager,
and business web address. | | OK | Closes
the dialog box and saves any changes you've made. | | Cancel
| Closes
the dialog box without saving any changes you've made. | |
|
Edit Button
You can edit an Address Book entry after you create
it. You may have to edit an entry if a person's e-mail address or contact information
changes. You can also edit an entry when you need to assign a nickname to an e-mail
address.
To edit a name in your Address Book, select the name you want
to edit and then click on Properties icon or double-click the name list. Make
any changes you need to and click on OK.
Delete Button
When you no longer need an e-mail address you can delete the Address Book entry
using the Delete button. When you delete an entry, it is permanently deleted
and cannot be restored; you would have to create it again.
To delete
an Address Book entry, select the entry you want to delete and then click Delete
or press the Delete key. It will prompt you whether you want to delete that entry
or not. Click on Yes to permanently delete it from the address book, or click
on No to keep it in the address book.
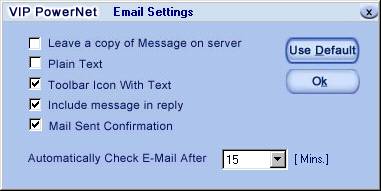
New
Mail Notification VIP
PowerNet 1.1 will notify you whenever you receive a new e-mail while browsing
the Web. You will be notified with an icon in your system tray (the indented area
on your Windows toolbar).
The default setting is set in such a way that it will check for a new mail every
15 minutes. If you wish to change the settings then you can go in to the e-mail
settings dialog box and change the time interval. To
access the e-mail settings dialog box:
-
Click on Mail Room icon at the top of the browser or click on CP icon at the bottom
of the browser in the status bar.
-
Click on the "E-mail Settings".
-
Select the time interval from the drop down menu at the bottom of the dialog.
- Click
OK.
|