A.
Mail Room When
clicked on Mail Room icon on the browser, it takes the user to the Main
Mail Room window. If the user is connected from ISP/LAN then while accessing the
Mail Room he/she needs to enter the user name and password. If the user is connected
from Modem, then the user name and password is not required. Once
entered into the Mail Room, the first time when the user enters the Mail Room,
it automatically checks for the New Mails on the server. The Mail Room contains
the following Buttons:
Write, Read, Addresses, Save Email, Print, Previous, Next, Reply, Reply All, Forward,
Check Mail, Delete, and Email Settings. Inbox, Old Mail, Sent Mail, Outbox,
and Trash. 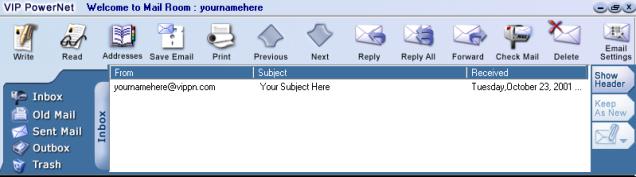
Their functionalities are as follows:
Inbox:
When pressed this button(icon), it shows the unread e-mail(s) in
the inbox.
To access this feature:
Click on Mail Room and
then click on Inbox.
Old Mail:
When pressed
this button(icon), it shows the read e-mail(s) To
access this feature:
Click on Mail Room and then click on Old Mail.
Sent
Mail:
When pressed this button (icon), it shows the e-mail(s) previously
sent to others from the user's e-mail account To
access this feature:
Click on Mail Room and then click on Sent
Mail. Outbox:
When pressed this button (icon), it shows the e-mail(s) that the user
decided to send at a later time. To
access this feature:
Click on Mail Room and then click on Outbox.
Trash:
When pressed this button (icon), it deletes all the e-mail(s) from
the trash folder. To
access this feature:
Click on Mail Room and then click on Trash.
Check
Mail:
When pressed this button (icon), it checks for the new e-mail(s)
from the server and places them in the inbox. To
access this feature:
Click on Mail Room and then click on Check
Mail
Read:
When pressed this button (icon), it pops up with another window,
which provides the options for Reply, Reply All, Forward, Save Email,
Print, Previous, Next, Addresses with the e-mail message. To
access this feature:
Click on Mail Room and then click on Read.
Reply:
When pressed this button (icon), it will open the compose window with pre-filled
reply address of the person and subject, that user received the mail from. To
access this feature:
Click on Mail Room, and then click on the mail
that you would like to read then click on Read and click on Reply.
Reply
All:
When pressed this button (icon), it will reply to all the Recipients
listed on the original e-mail received. To
access this feature:
Click on Mail Room and then click on the mail
that you would like to read then click on Read and click on Reply All.
Forward:
When pressed this button (icon), it will allow the user to Forward
the e-mail to any other e-mail address that user wishes. To
access this feature:
Click on Mail Room and then click on the mail
that you would like to read and then click on Read and click on Forward. 
Save
Email:
When pressed this button (icon), after selecting the e-mail,
it will allow you to save the e-mail on to your computer either in the text or
html format. To
access this feature:
Select the e-mail you want to save, then Click on Save
Email. Print:
When pressed this button (icon),
after selecting the e-mail, it will print the e-mail. To
access this feature:
Select the e-mail you want to print, then Click on Print.
Delete:
When pressed this button (icon), after selecting the e-mail, it will delete
the e-mail from the user's account and the server. To
access this feature:
Select the e-mail you want to delete, then Click on
Delete. Write:
When pressed this button (icon), the user will be able to Write an e-mail,
it will Pop-up a window containing following items,
Send, Send Later,
Attachment, Cut, Copy, Paste, Spelling,
Text boxes: To, Subject, CC, BCC
and Word Editor. 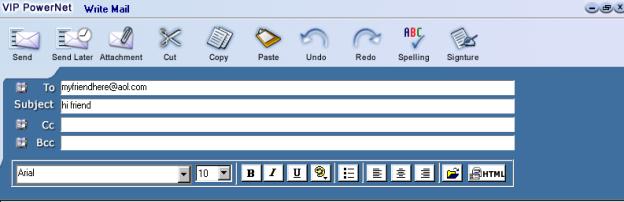
i.)
Send:
When pressed this button (icon), the user will be able to
send the e-mail to the e-mail address that appears in the To: text window.
To
access this feature:
Click on Mail Room, and then click on Write
then click on Send. ii.)
Send Later:
When pressed this button (icon), the user will be able
to send the e-mail later. This will save the written e-mail in the Outbox.
To
access this feature:
Click on Mail Room, and then click on Write
then click on Send Later. iii.)
Attachment:
When pressed this button (icon), the user will be able
to send any file(s) on the computer to someone else on another computer by attaching
them to an e-mail. To
access this feature:
Click on Mail Room, and then click on Write
then click on Attachment. When you click on Attachment, a window
will pop up on your screen, from which you can find and select any file on your
hard drive (or any other drive on your computer). Your hard drive (usually C:/)
is the default drive. Locate the file you want to attach, and double-click on
it, or highlight it and click on OK. You will now be able to see that file
attached to your e-mail. iv.)
Cut:
To remove text from e-mail, select (highlight) the information
you want to remove from e-mail, then click on Cut button.
To access this
feature:
Click on Mail Room, and then click on Write
then click on Cut. v.)
Copy:
To copy information from e-mail into another document, select
(highlight) the information you want to copy, and then click Copy button.
To access this feature:
Click on Mail Room, and then click on
Write then click on Copy.
vi.) Paste
To paste information from a clipboard into e-mail, select the area into the
e-mail text box where you want to paste the copied information (place the cursor),
and then click Paste button. To
access this feature:
Click on Mail Room, and then click on Write
then click on Paste. vii.)
Spelling
In order to spell check your e-mail document, the user
can simply type the e-mail and click on Spelling button to check for any
spelling errors in the e-mail. To
access this feature:
Click on Mail Room, and then click on Write
then click on Spelling. viii.)
To, Cc, and Bcc
If the user wants to send an e-mail to more than
one recipient then instead of typing the addresses, he/she can just click on To
button, and select the recipients from the address book. Users can use Cc
to send a message to someone and let that person know that he/she also sent
a carbon copy to others. Users can also use Bcc to send a message to someone
and not disclose that they have also sent a blind carbon copy to others. Select
the recipient from the address book and click on To/Cc/Bcc icon in the
Select recipients dialog box. 
To access this
feature:
Click on Mail Room, and then click on Write then click
on To/Cc/Bcc. Keep
As New:
Once the user reads the mail, it is stored under the Old
Mail folder. If you want to put the mail back into the Inbox folder
from the Old Mail folder, you can simply do so by selecting (highlighting)
the mail from the Old Mail folder, and then click on Keep As New,
and it will put the e-mail back into the New Mail (Inbox). E-mail
Settings:
When clicked on E-mail Settings it pops-up with a window
containing three options of formatting the mailbox.
i.)
Leave a copy of Message on Server If Checked, this will leave a copy of the e-mail(s),
on the server after reading the e-mail(s).
ii.) Plain Text: If Checked,
it will appear as more readable text in the mail.
|